After reviving my interest in motorcycling by purchasing a Royal Enfield (see previous blog) , and being asked by Angus “Don’t you already have a motorbike in the shed and…. CAN I RIDE IT !!!!! ? ” I decided to restore my old trail bike which has sat in the shed under a shower curtain since the 90’s.
HISTORY
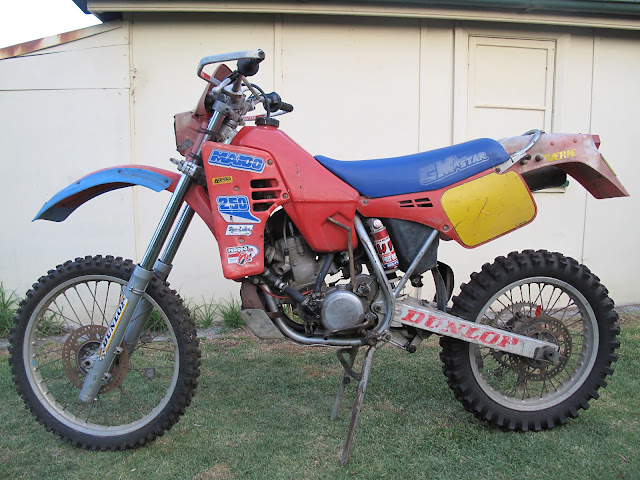
The bike is a Maico which like the Royal Enfield is a marque steeped in history.
Founded in 1926 by Otto and Wilhelm Maisch, Maicowerk A.G. made road bikes and scooters but were most famous for their high-powered motocross and cross-country bikes of the 70’s and early 80’s.
Maico went bankrupt in 1983 and a new company was formed by the sons of Wilhelm Maisch , Peter and Hans called Gebruder Maisch (Maisch Brothers), hence the GM prefix in the model numbers and GMStar brand on the seat which distinguish it from a “real” Maico.
Before I purchased the bike I had been a Honda fan having bought my first bike second hand, an 83 XR200R and quickly upgraded to a new 1985 XR350R and started competing in Enduro races.Back then I was a skinny 19 yr old weighing in at about 65Kg on a bike that was twice my own mass.
I
With lots of weight, not much power and pogo-stick suspension I quickly was persuaded by the German riding crew from Hawkesbury MCC that I had to ” Go German or Go Home”. At that stage European bikes ( Husqvarna, KTM and Maico) were miles ahead of the Jap bikes especially in Enduro.
This was the motocross bike, the Enduro had different gearing and a head light & tail light.
Maico manuals and brochures list the bike having an Ohlin shock rather than the White Power that I have so it is possible that I have one of the pre-production models.
Not many of these bikes were produced, I read on one forum that only 100 were made. I knew about half a dozen people who had one of them in Australia back in the time.
I assume most of them are dead and buried ( there was one mentioned on the forum )
It also mentioned the existence of another pre-production model. Maybe its mine that they were alluding to ????
The new model was a bit of a break-thru as it had massive suspension, excellent handling, front and rear disc brakes and an exhaust power-valve that gave grunty off the throttle bottom end torque like a four-stroke. From the specs I gather it had 17HP off idle and 49HP at 8000rpm.

As you can see from the above specs the bike had an outstanding power-to-weight ratio
100kg( 220LB) and 49HP = 4.4LB / HP
I wished I had a 500 – but my arms would be 6 inches longer now trying to hang on !!
Here’s me back in the day
So I purchased the Maico some time in 1986 and rode Enduros on it for a few years and then as things change and people move on, I lost interest in competitive riding but over the years managed to go for the odd social ride however eventually I ended up simply not knowing anyone who owned a dirt bike anymore and I gave up 🙁
The bike developed a problem with the hydraulic brakes and hence did not pass rego the next year and then due to neglect over time the master cylinders seized and it was all put in the “too hard basket”.
INSPECTION
I dragged it out of the shed dusted it off and assessed the damage.
I knew the brakes needed a complete rebuild and were my worst nightmare.
After all, the brakes were the cause of the demise of the bike in the first place and if they could not be fixed it was a show-stopper, even if I managed to get the bike to “go” it was no use unless it also “stopped”.
Front suspension – fork legs rusted, needs fork service
Rear shock – don’t want to think about it
Chain – seized, wear pad and roller rotten
Front sprocket – broken tooth and worn
Air filter – foam disintegrated but the cage was intact
I removed the spark plug and it was black and oily
Opened the radiator and its contents were clean and green
Checked the gearbox oil and it looked water-free
Plastics looking a little worn and sun faded
Electrics – fingers crossed
Engine – cranks over OK
Tyres – rock hard rubber
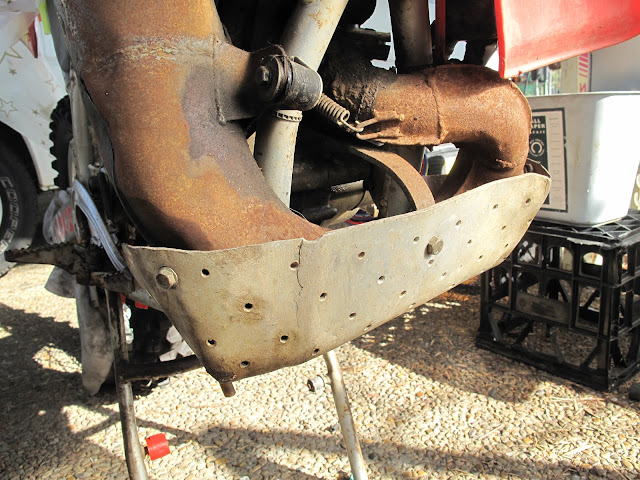
Exhaust pipe – needs dent removal and welding
I have some schrader valve (tyre) fittings from an earlier repair that you weld to each end of the pipe and after heating up with an oxy set you pump and pressurise the pipe to blow out the dents
The old home-made bash guard needs some TLC along with the pipe
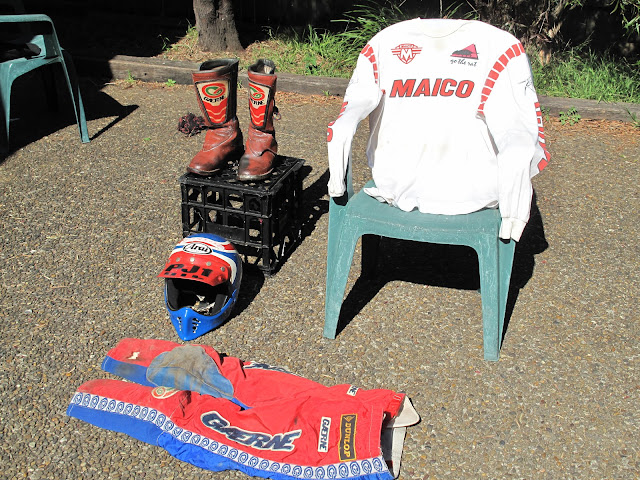
Riding gear – 80’s style and too tight, waist 32″ but still fits my 36″ butt
Ok things don’t look that bad in the “Go” department – still worried about the stoppers though.
After talking to some people I thought I would take the plunge and try to start it
I used some mower fuel as it is richer in oil and started it up briefly just so I knew it ran.
Phew !!! – off to the intamanet
RESEARCH
Found some local sites/forums and came across http://www.vmxunlimited.com/which listed some of the parts I needed and some that I might need in the future. Gave them a call and got some good advice from Les and also some contacts for servicing.
I decided to concentrate on the brakes and found http://www.burtbrosautomotive.com.au/
who rebuild brakes and after a quick chat bundled up my parts and brought them over. Troy arranged a quote for the master cylinders and callipers to be refurbished and some new hoses and fittings.
Whilst I was waiting for the brakes I thought I would investigate all the other parts required and decide on a plan of attack since I did not want to spend money on frilly-bits if the brakes were totalled and I was back to square-one. I also did not want to replace anything that was not absolutely necessary as until I rode it I would not know if the bike had any other serious problems…..Like a bottom end bearing or piston ring etc.
REBUILD
To get the motor running properly it needed an air filter so that was the first investment.
Uni-Filter had a filter in stock and still have the pattern if they need to make more.
Next the oil and coolant needed to be replaced and after dumping the murky gear box oil I thought I better open the clutch cover in case coolant had leaked into it thru a gasket or the water pump.
There was a little rust on the top of the clutch plates just where they were exposed to the air but no signs of water ingress as all of the gears etc were fine.
I also drained the coolant and it looked good too – no rust or oil to be seen
After buying some Loctite RTV silicone to make a gasket I re assembled the motor and mixed up some fuel prepared to start it up. It ran OK, a bit smokey but it revved cleanly and idled once warmed up. So that’s another test out of the way but I still won’t know if the thing is any good till I get it on a track.
I got the call from Burt Bros. that the brakes could be repaired but custom seals had to be made and it would take a few weeks.
I went about fixing the second group of items needing attention to actually ride the bike.
I removed the rear wheel and cleaned out the chain adjusters and spacers waiting for the calliper to return before completing the rear end assembly.
I replaced the front sprocket as it was worn out and had a broken tooth (sounds like me)
Lucky Maico used the same shaft as KTMs and the sprocket is an off the shelf item $35
I had a spare chain but before I could fit it I needed to replace the chain wear pad and roller which were not available locally and could not be seen on either the UK or Canadian Maico sites. I went down to Motor Cycle Accessories Supermarket and looked around their plastics dept. as they had heaps of UFO gear which was stock on the bike.
I picked up a pair of fork gaiters $30 and some UFO headlight straps $15 and a UFO chain guide from an XR600 for $50.
Turned it upside down since Maico runs the chain and kick-starter on the opposite side to other bikes and it sort of fitted but due to differences in the shape of the swing-arm I had to “take to it” with my electric hand planer. After making a jig to hold it I was able to remove the too-thick bits so it had clearance for the roller and fit the swing arm properly.
Next I needed a roller so I went and saw Jason from ESS Boardstore who had some second hand skateboard wheels but unfortunately they were too large in diameter even though the bearing etc fitted – I quickly discounted turning them down on a lathe as I could see a wheel comming out of the chuck and being implanted in my forehead. DOH!
By fluke I needed some motor oil for Angus’ bike and when I went to DHZ’s factory to pick it up I noticed on the shelf next to the oil an assortment of chain rollers!!! Only $10 ea.
So the drive line was ready but I could not install the rear wheel properly untill the brakes came back.
BRAKES
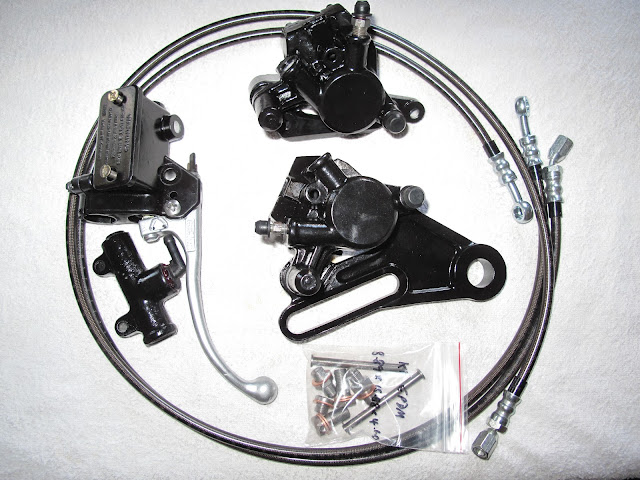
I got the call that the brakes were fixed and after picking them up I went about installing them ASAP as they were the last thing “stopping” me (yes sorry bad pun) from riding it.
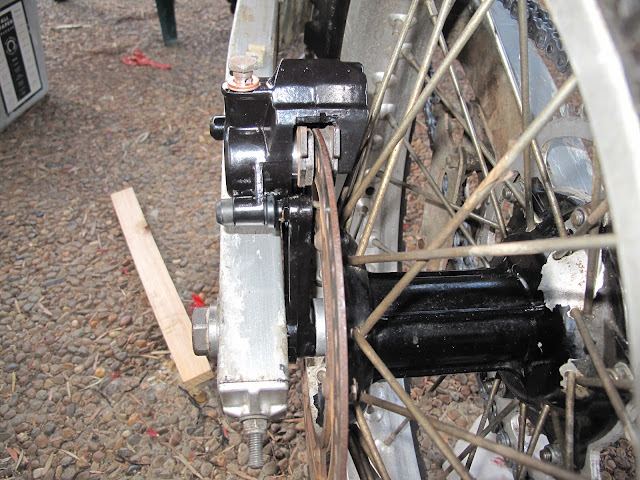
I fitted the rear calliper first as that would facilitate installing the rear wheel and chain etc
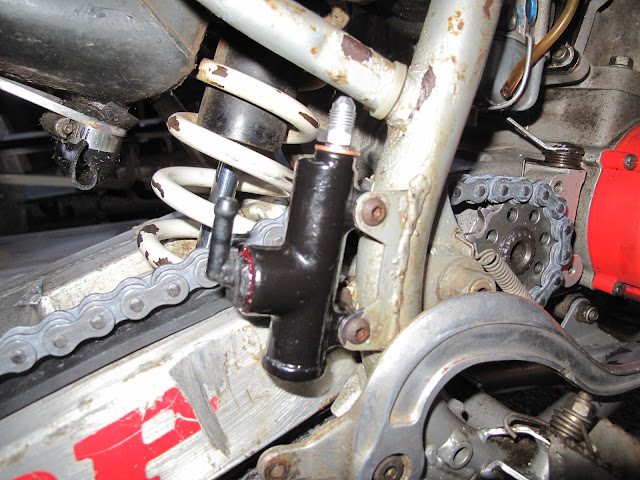
Then I went about installing the master cylinder and hose and completed the rear end assembly and refitted the chain then needed to bleed the brakes ……ARGGGH!!!!
I could not manage to get any pressure at all and then I noticed the fittings were weeping indicating a leak. The problem was the copper washers were too large in diameter and were fouling the recess where the brake line fitting screws in.
I dropped in and saw Steve from http://www.bandrbrakes-castlehill.com.au/ and he sorted me out with an assortment of washers and some circlips for the brake pad retainers. It turns out he is an MX rider himself and was very helpful with advice and well wishes.
The smaller washers did the trick and after a few phone calls and some advice from Troy and Mick from Burt Bros I finally managed to get pressure on the rear brake.
Next was the front. I installed the calliper and master cylinder and started the bleed process and again had issues with the washers but knew what to do this time as I had got some some extra washers from Steve just incase.
Once the pads started to bite I thought I will do a rolling test and then start it up and have a bit of a ride around the back yard WOO HOO its running…..But my joy was short lived.
I got some more pressure happening in the front by continuing to bleed the brakes but noticed that the lever hit the bars so I went and adjusted the position of the master-cylinder on the bars to get better purchase and a complete stroke and I knocked the plastic inspection window out of the master cylinder !!!!
Fluid pissed everywhere and I just stood there mouth open for a few seconds while my damaged brain processed the information and realised what I just did.
The thing was brittle yellowed plastic with S.F.A. chance of glue working on it especially since it was held in with an o-ring which would prevent the two bits sticking back together.
Then my natural reaction kicked in and I started chucking tools and kicking the dog.
At this time of the restoration, after spending two days bleeding the brakes, I just wanted to put the bike on a trailer and take it to the tip
IT WAS FRICKING RUNNING 2 MINUTES BEFORE ..NOW ITS STUFFED AGAIN
All that work down the drain and I still did not know if the bloody engine worked properly.
No riding today….sent the family off to Surf Life Saving Nippers training and packed the tools up.
I got a beer out of the fridge and forgot about motorcycles for the rest of the day.
Sometime during the night after lots of beer I had a brain wave. I had used a product before to repair surfboards and other broken things called Selley’s Aqua Kneed It – a water proof epoxy putty.
Sunday morning was the Bennent Board Carninval at the beach but it was 4ft plus solid onshore and I knew the outcome. I passed on Nippers and sent the family off to the beach without me once more and got on the Enfield and rode down to bunnings. Walked to the adhesive aisle and after discounting any araldite or expoy glues which may not stick to the plastic anyway I found what I needed – Selleys Metal Kneed It.
It said – “repairs radiators engine parts fuel tanks etc – can be machined or drilled etc”
So without getting my hopes up I roughly fashioned a plug for the mastercylinder fluid level inspection window and moulded it into position and went and watched telly for an hour.
I mounted the master cylinder on the bike again filled it up with brake fluid and “Hey Presto” no leaks – BULL SHIT !!!!!!! I could not believe how easy was that…..I was kicking myself
Why the hell didn’t I do that yesterday ? – I was too pissed off to think straight and consequently did not take any photos of the disaster either.
So I quickly bled the front brakes and packed up all my gear, rang the missus and found that as suspected the board race was off as Warringah Council closed the beach.
They returned home in time for me to load the bike on the trailer and head to Pacific Park.
TEST RIDE
We arrived at the track with only a couple of hours riding time since it was almost 4pm
I unloaded Angus’ bike and whilst he geared up I unload mine and started them both up.
I left Jenny to supervise Angus and Emma on the beginners track and I took off to do some laps on the flat track.
The bike felt good but I did not push it as god knows what’s been going on inside the motor.
After a few laps I came back and assessed things and oiled the chain. For some reason the air valves on the from forks were letting oil out and it sprayed all over me which its probably due to the fork oil thinning over time. Some tyre valve caps did the trick.
A fork service is next on the to-do list along with installation of the fork gaiters I purchased.
I have already spoken to Allan from http://www.maw.com.au/ at Castle Hill about doing the work since he is also a Maico owner having a 70’s motocrosser and a Bultaco.
The front brake still felt a bit spongey and scared me approaching a few fast corners.
Another factor is that there was some scale on the fron disc and I may have bought pretty hard sintered pads which I may swap to the rear to save drag-wear which happens from touching the pedal with your foot by accident etc.
Everything else seemed OK so I just went and rode it for a while and then took the kids for a ride out to the back tracks where they had not ridden before.
It was good to finally be able to ride the bike again after over a decade and it was certainly good to go riding with the kids – can’t wait for Emma to get her bike.
Clutch hands
Emma all pimped out in her new riding gear on Angus’ bike
Angus leading the way
I turned to the left, whilst Angus and Emma, being experienced went right
So even though there is alot to do on the bike I am very impressed that I was able to get it running again after so many years in the shed.
The plan is to attack the front forks asap and then some tyres followed by new bars and grips then look at the electrics and lights so I can attempt to get it re-registered again.
CREDITS
Thanks again to
Les from VMX Unlimited (Mainly Maico)
Troy and Mick from Burt Brothers
Steve from B&R Brakes
Allan from Motorcycle Accessory Warehouse
Ben from MCAS Auburn
for the advice and great service in helping me get it going again.

Maico GM250E 1986 Restoration
After reviving my interest in motorcycling by purchasing a Royal Enfield (see previous blog) , and being asked by Angus “Don’t you already have a motorbike in the shed and…. CAN I RIDE IT !!!!! ? ” I decided to restore my old trail bike which has sat in the shed under a shower curtain since the 90’s.
HISTORY
The bike is a Maico which like the Royal Enfield is a marque steeped in history.
Founded in 1926 by Otto and Wilhelm Maisch, Maicowerk A.G. made road bikes and scooters but were most famous for their high-powered motocross and cross-country bikes of the 70’s and early 80’s.
Maico went bankrupt in 1983 and a new company was formed by the sons of Wilhelm Maisch , Peter and Hans called Gebruder Maisch (Maisch Brothers), hence the GM prefix in the model numbers and GMStar brand on the seat which distinguish it from a “real” Maico.
Before I purchased the bike I had been a Honda fan having bought my first bike second hand, an 83 XR200R and quickly upgraded to a new 1985 XR350R and started competing in Enduro races.Back then I was a skinny 19 yr old weighing in at about 65Kg on a bike that was twice my own mass.
I 
With lots of weight, not much power and pogo-stick suspension I quickly was persuaded by the German riding crew from Hawkesbury MCC that I had to ” Go German or Go Home”. At that stage European bikes ( Husqvarna, KTM and Maico) were miles ahead of the Jap bikes especially in Enduro.

This was the motocross bike, the Enduro had different gearing and a head light & tail light.

Maico manuals and brochures list the bike having an Ohlin shock rather than the White Power that I have so it is possible that I have one of the pre-production models.
Not many of these bikes were produced, I read on one forum that only 100 were made. I knew about half a dozen people who had one of them in Australia back in the time.
I assume most of them are dead and buried ( there was one mentioned on the forum )
It also mentioned the existence of another pre-production model. Maybe its mine that they were alluding to ????
The new model was a bit of a break-thru as it had massive suspension, excellent handling, front and rear disc brakes and an exhaust power-valve that gave grunty off the throttle bottom end torque like a four-stroke. From the specs I gather it had 17HP off idle and 49HP at 8000rpm.

As you can see from the above specs the bike had an outstanding power-to-weight ratio
100kg( 220LB) and 49HP = 4.4LB / HP or the same as a McLaren F1 GT Supercar.

I wished I had a 500 – but my arms would be 6 inches longer now trying to hang on !!

Here’s me back in the day
So I purchased the Maico some time in 1986 and rode Enduros on it for a few years and then as things change and people move on, I lost interest in competitive riding but over the years managed to go for the odd social ride however eventually I ended up simply not knowing anyone who owned a dirt bike anymore and I gave up 🙁
The bike developed a problem with the hydraulic brakes and hence did not pass rego the next year and then due to neglect over time the master cylinders seized and it was all put in the “too hard basket”.
INSPECTION
I dragged it out of the shed dusted it off and assessed the damage.
I knew the brakes needed a complete rebuild and were my worst nightmare.

After all, the brakes were the cause of the demise of the bike in the first place and if they could not be fixed it was a show-stopper, even if I managed to get the bike to “go” it was no use unless it also “stopped”.
Front suspension – fork legs rusted, needs fork service
Rear shock – don’t want to think about it
Chain – seized, wear pad and roller rotten
Front sprocket – broken tooth and worn
Air filter – foam disintegrated but the cage was intact
I removed the spark plug and it was black and oily
Opened the radiator and its contents were clean and green
Checked the gearbox oil and it looked water-free
Plastics looking a little worn and sun faded
Electrics – fingers crossed
Engine – cranks over OK
Tyres – rock hard rubber
Exhaust pipe – needs dent removal and welding
I have some schrader valve (tyre) fittings from an earlier repair that you weld to each end of the pipe and after heating up with an oxy set you pump and pressurise the pipe to blow out the dents
The old home-made bash guard needs some TLC along with the pipe
Riding gear – 80’s style and too tight, waist 32″ but still fits my 36″ butt
Ok things don’t look that bad in the “Go” department – still worried about the stoppers though.
After talking to some people I thought I would take the plunge and try to start it
I used some mower fuel as it is richer in oil and started it up briefly just so I knew it ran.
Phew !!! – off to the intamanet
RESEARCH
Found some local sites/forums and came across http://www.vmxunlimited.com/ which listed some of the parts I needed and some that I might need in the future. Gave them a call and got some good advice from Les and also some contacts for servicing.
I decided to concentrate on the brakes and found http://www.burtbrosautomotive.com.au/
who rebuild brakes and after a quick chat bundled up my parts and brought them over. Troy arranged a quote for the master cylinders and callipers to be refurbished and some new hoses and fittings.
Whilst I was waiting for the brakes I thought I would investigate all the other parts required and decide on a plan of attack since I did not want to spend money on frilly-bits if the brakes were totalled and I was back to square-one. I also did not want to replace anything that was not absolutely necessary as until I rode it I would not know if the bike had any other serious problems…..Like a bottom end bearing or piston ring etc.
REBUILD
To get the motor running properly it needed an air filter so that was the first investment.

Uni-Filter had a filter in stock and still have the pattern if they need to make more.
Next the oil and coolant needed to be replaced and after dumping the murky gear box oil I thought I better open the clutch cover in case coolant had leaked into it thru a gasket or the water pump.

There was a little rust on the top of the clutch plates just where they were exposed to the air but no signs of water ingress as all of the gears etc were fine.
I also drained the coolant and it looked good too – no rust or oil to be seen
After buying some Loctite RTV silicone to make a gasket I re assembled the motor and mixed up some fuel prepared to start it up. It ran OK, a bit smokey but it revved cleanly and idled once warmed up. So that’s another test out of the way but I still won’t know if the thing is any good till I get it on a track.
I got the call from Burt Bros. that the brakes could be repaired but custom seals had to be made and it would take a few weeks.
I went about fixing the second group of items needing attention to actually ride the bike.

I removed the rear wheel and cleaned out the chain adjusters and spacers waiting for the calliper to return before completing the rear end assembly.
I replaced the front sprocket as it was worn out and had a broken tooth (sounds like me)

Lucky Maico used the same shaft as KTMs and the sprocket is an off the shelf item $35
I had a spare chain but before I could fit it I needed to replace the chain wear pad and roller which were not available locally and could not be seen on either the UK or Canadian Maico sites. I went down to Motor Cycle Accessories Supermarket and looked around their plastics dept. as they had heaps of UFO gear which was stock on the bike.

I picked up a pair of fork gaiters $30 and some UFO headlight straps $15 and a UFO chain guide from an XR600 for $50.
Turned it upside down since Maico runs the chain and kick-starter on the opposite side to other bikes and it sort of fitted but due to differences in the shape of the swing-arm I had to “take to it” with my electric hand planer. After making a jig to hold it I was able to remove the too-thick bits so it had clearance for the roller and fit the swing arm properly.
Next I needed a roller so I went and saw Jason from ESS Boardstore who had some second hand skateboard wheels but unfortunately they were too large in diameter even though the bearing etc fitted – I quickly discounted turning them down on a lathe as I could see a wheel comming out of the chuck and being implanted in my forehead. DOH!

By fluke I needed some motor oil for Angus’ bike and when I went to DHZ’s factory to pick it up I noticed on the shelf next to the oil an assortment of chain rollers!!! Only $10 ea.

So the drive line was ready but I could not install the rear wheel properly untill the brakes came back.
BRAKES
I got the call that the brakes were fixed and after picking them up I went about installing them ASAP as they were the last thing “stopping” me (yes sorry bad pun) from riding it.

I fitted the rear calliper first as that would facilitate installing the rear wheel and chain etc
Then I went about installing the master cylinder and hose and completed the rear end assembly and refitted the chain then needed to bleed the brakes ……ARGGGH!!!!
I could not manage to get any pressure at all and then I noticed the fittings were weeping indicating a leak. The problem was the copper washers were too large in diameter and were fouling the recess where the brake line fitting screws in.
I dropped in and saw Steve from http://www.bandrbrakes-castlehill.com.au/ and he sorted me out with an assortment of washers and some circlips for the brake pad retainers. It turns out he is an MX rider himself and was very helpful with advice and well wishes.
The smaller washers did the trick and after a few phone calls and some advice from Troy and Mick from Burt Bros I finally managed to get pressure on the rear brake.
Next was the front. I installed the calliper and master cylinder and started the bleed process and again had issues with the washers but knew what to do this time as I had got some some extra washers from Steve just incase.
Once the pads started to bite I thought I will do a rolling test and then start it up and have a bit of a ride around the back yard WOO HOO its running…..But my joy was short lived.
I got some more pressure happening in the front by continuing to bleed the brakes but noticed that the lever hit the bars so I went and adjusted the position of the master-cylinder on the bars to get better purchase and a complete stroke and I knocked the plastic inspection window out of the master cylinder !!!!
Fluid pissed everywhere and I just stood there mouth open for a few seconds while my damaged brain processed the information and realised what I just did.
The thing was brittle yellowed plastic with S.F.A. chance of glue working on it especially since it was held in with an o-ring which would prevent the two bits sticking back together.
Then my natural reaction kicked in and I started chucking tools and kicking the dog.
At this time of the restoration, after spending two days bleeding the brakes, I just wanted to put the bike on a trailer and take it to the tip
IT WAS FRICKING RUNNING 2 MINUTES BEFORE ..NOW ITS STUFFED AGAIN
All that work down the drain and I still did not know if the bloody engine worked properly.
No riding today….sent the family off to Surf Life Saving Nippers training and packed the tools up.
I got a beer out of the fridge and forgot about motorcycles for the rest of the day.
Sometime during the night after lots of beer I had a brain wave. I had used a product before to repair surfboards and other broken things called Selley’s Aqua Kneed It – a water proof epoxy putty.
Sunday morning was the Bennent Board Carninval at the beach but it was 4ft plus solid onshore and I knew the outcome. I passed on Nippers and sent the family off to the beach without me once more and got on the Enfield and rode down to bunnings. Walked to the adhesive aisle and after discounting any araldite or expoy glues which may not stick to the plastic anyway I found what I needed – Selleys Metal Kneed It.
It said – “repairs radiators engine parts fuel tanks etc – can be machined or drilled etc”
So without getting my hopes up I roughly fashioned a plug for the mastercylinder fluid level inspection window and moulded it into position and went and watched telly for an hour.
I mounted the master cylinder on the bike again filled it up with brake fluid and “Hey Presto” no leaks – BULL SHIT !!!!!!! I could not believe how easy was that…..I was kicking myself
Why the hell didn’t I do that yesterday ? – I was too pissed off to think straight and consequently did not take any photos of the disaster either.
So I quickly bled the front brakes and packed up all my gear, rang the missus and found that as suspected the board race was off as Warringah Council closed the beach.
They returned home in time for me to load the bike on the trailer and head to Pacific Park.
TEST RIDE
We arrived at the track with only a couple of hours riding time since it was almost 4pm
I unloaded Angus’ bike and whilst he geared up I unload mine and started them both up.
I left Jenny to supervise Angus and Emma on the beginners track and I took off to do some laps on the flat track.
The bike felt good but I did not push it as god knows what’s been going on inside the motor.
After a few laps I came back and assessed things and oiled the chain. For some reason the air valves on the from forks were letting oil out and it sprayed all over me which its probably due to the fork oil thinning over time. Some tyre valve caps did the trick.
A fork service is next on the to-do list along with installation of the fork gaiters I purchased.
I have already spoken to Allan from http://www.maw.com.au/ at Castle Hill about doing the work since he is also a Maico owner having a 70’s motocrosser and a Bultaco.
The front brake still felt a bit spongey and scared me approaching a few fast corners.
Another factor is that there was some scale on the fron disc and I may have bought pretty hard sintered pads which I may swap to the rear to save drag-wear which happens from touching the pedal with your foot by accident etc.
Everything else seemed OK so I just went and rode it for a while and then took the kids for a ride out to the back tracks where they had not ridden before.
It was good to finally be able to ride the bike again after over a decade and it was certainly good to go riding with the kids – can’t wait for Emma to get her bike.
Clutch hands
Emma all pimped out in her new riding gear on Angus’ bike
Angus leading the way
I turned to the left, whilst Angus and Emma, being experienced went right
So even though there is alot to do on the bike I am very impressed that I was able to get it running again after so many years in the shed.
The plan is to attack the front forks asap and then some tyres followed by new bars and grips then look at the electrics and lights so I can attempt to get it re-registered again.
CREDITS
Thanks again to
Les from VMX Unlimited (Mainly Maico)
Troy and Mick from Burt Brothers
Steve from B&R Brakes
Allan from Motorcycle Accessory Warehouse
Ben from MCAS Auburn
for the advice and great service in helping me get it going again.



Recent Comments